How to set up checkout with two PSPs in 5 simple steps with commercetools


Introduction
Checkout is one of the heaviest flows in commerce. It sits at the crossroads of pricing, payments, fraud checks, taxes, loyalty and fulfilment — and it all needs to happen in seconds. That’s why commercetools created commercetools Checkout, which allows you to leverage the built-in checkout UI, integrate multiple payment service providers (PSPs), and orchestrate them using flexible business logic rather than hard-coded rules
In this guide, we’ll walk you through five simple steps to set up commercetools Checkout with two PSP connectors, such as Adyen and PayPal. By the end, you’ll have a fully working checkout that can route transactions dynamically, give shoppers the payment choice they expect, and keep your business in control.
The end-to-end flow
Here’s what the journey looks like at a high level:
- Set up PSP connectors in Merchant Center: Install and configure Adyen and PayPal.
- Create a complete checkout application: One branded flow covering cart, address, delivery, payment and confirmation.
- Define PSP routing logic: Decide when Adyen or PayPal should be used (by geography, currency, transaction size, payment method preference).
- Integrate the Checkout Browser SDK into your storefront: Connect your frontend with a few lines of code.
Run and monitor the live journey: Shoppers see the right methods, payments get routed correctly and you track everything via events and messages.
Step 1: Set up PSP connectors in Merchant Center
The first step is to make PSPs available across your commercetools project.
- Go to Merchant Center → Connect.
- Select Adyen from the list of built-in connectors, click Install and enter your API credentials (merchant account, API key, client key) and PSP Credentials.
- Do the same for PayPal, adding your client ID and secret.
- Both connectors are now live and reusable.
Why it matters:
- You avoid one-off integrations that eat dev cycles.
- Each connector is built on the Payment Integration Template, so retries and error handling work the same way.
- Adding connectors once makes them available everywhere — no duplication.

Step 2: Create a complete checkout application
Now that PSPs are configured, it’s time to set up the actual checkout flow.
- In Merchant Center, navigate to Checkout.
- Click Create New Application.
- Choose Complete Checkout Mode. This option provides a full flow — cart totals, address collection, delivery methods, payments and payment confirmation.
- Select the payment methods you want to offer:
- From Adyen → Credit Card, Apple Pay.
- From PayPal → PayPal Wallet.
- Customize branding — add your logo, button text and colors to match your storefront.

Why it matters:
- Complete Checkout Mode saves you from having to build forms from scratch.
- It ensures cart, checkout and order stay consistent (see Carts and Orders).
- Shoppers see a polished, branded experience instead of a patchwork of redirect screens.
Step 3: Define PSP routing logic
Here’s where the real strategy comes in. You’re not just plugging in PSPs — you’re deciding how they work together.
In Checkout Admin, you can create rules such as:
- By geography: EU cards → Adyen, US wallets → PayPal.
- By currency: EUR → Adyen, USD → PayPal.
- By amount: <$500 USD → PayPal, ≥$500 USD → Adyen.
- By method: Credit Cards → Adyen, Wallets → PayPal.
Rules use the Payment Flows framework.
Why it matters:
- You stay in control of your PSP mix.
- You improve approval rates by sending transactions to the best-performing provider.
- You reduce costs by routing low-value payments to cheaper methods.
- You increase resilience by keeping more than one PSP active.
Pro tip: Treat routing rules like pricing rules. Optimize them continuously to squeeze out more revenue.
Step 4: Integrate the Checkout Browser SDK into your storefront
Prerequisite: Create a Checkout Session (server-side).
Before you initialize the SDK, create a Checkout Session from your backend using the Sessions API. Use an access token with the manage_sessions scope, pass the Cart ID and your Checkout Application key, then capture the returned id — you’ll use it as sessionId in the SDK. Integrate Checkout
Example (HTTP):
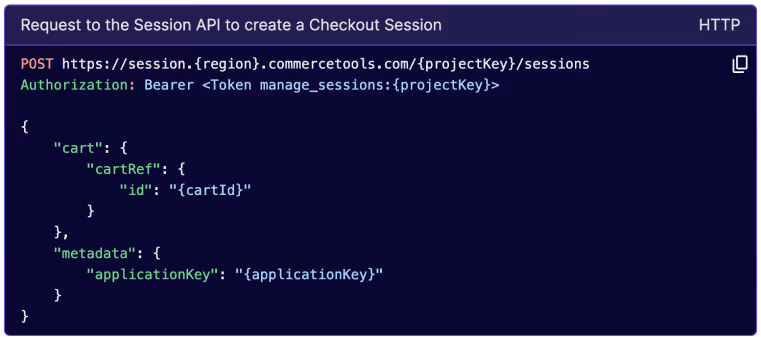
The response includes "id": "<session-id>". Use that value below as sessionId. commercetools
Install the SDK (frontend):
npm install @commercetools/checkout-browser-sdk
Initialize for Complete Checkout mode (frontend):

This uses the checkoutFlow method (Complete Checkout). It opens the Checkout UI for the provided sessionId. You can also render it inline by attaching it to an element with data-ctc, or keep the default full-screen overlay. See the SDK page for configuration options (locale, styles, address form overrides, skipping success/error pages, etc.).
Additionally, you can handle redirection to an order confirmation page by responding to Checkout messages/events.
Handle redirections from off-site payment methods:
Checkout helps you handle redirects back to your site in cases where the buyer was redirected to an external site to complete a payment (e.g., Klarna).
You only have to pass Checkout the paymentReference obtained from the URL. Checkout will handle order creation and inform you of the result, so you can redirect the buyer to a thank-you page.

Why it matters:
- The session guarantees the SDK has the right cart, application and permissions context.
- Using the official checkoutFlow init keeps your implementation aligned with commercetools’ supported pattern and avoids custom bootstrapping that can break during upgrades.
- Integration takes minutes, not months.
- Developers don’t rebuild forms — they just link the SDK to the Application key.
Merchants can update checkout rules or connectors in Merchant Center without redeploying code.
Step 5: Run and monitor the live journey
Time to see it in action:
- Shopper adds an item to their cart.
- Clicks Go to Checkout.
- Completes the flow: Address, delivery, payment selection.
- Sees the payment confirmation page.
Behind the scenes, events flow through Checkout Messages and Events:
- Payment authorized → Triggers receipt email.
- Refund issued → Updates finance + customer service.
- Loyalty points applied → Updates the shopper’s profile.
Why it matters:
- Checkout is no longer just “the last page.” It becomes the first step of retention.
- Real-time events keep finance, operations and marketing in sync.
You can adapt routing or add methods on the fly — without technical projects.
Final thoughts
Configuring two PSPs in commercetools Checkout isn’t just about resilience — it’s about strategy.
- Step 1–2 make payments available and usable.
- Step 3 turns them into a growth lever with smart rules.
- Step 4–5 tie it all into your customer experience and business operations.
With commercetools Checkout, you’re not trapped in DIY code or limited by a single PSP. You get choice, adaptability and business control — all from Merchant Center.
Get in touch with our experts and learn how to get started with commercetools Checkout.
Senior Product Manager specializing in checkout and payments. She leads initiatives to create seamless and reliable commerce experiences, improving journeys for both merchants and consumers. Passionate about innovation and user-centered design, Esra strives to make commerce more efficient, intuitive, and accessible for everyone.
.svg)